Thanks to Dakian Delomast, 四季 浪月, joseph j fonzi, Nicholas Baird, Nick Dombrowski, Douglas Custom Knives, ElementalBreakdown, Daniel Manns, Drew Certain, and Michael Shuey for becoming Knife Steel Nerds Patreon supporters! And Jeff Schafer for increasing his contribution.
Furnaces
Every once in a while someone asks me if the standard available knife heat treating furnaces are good enough for the task. Occasionally I see someone say that the common brands aren’t accurate or high quality and that anyone serious about heat treating should use an “industrial” or “scientific” furnace instead. Going through school doing steel research and then working in steel as my career means I have been around a lot of furnaces. There are all different types and while some are very high quality, the differences can be surprisingly small between furnaces you might see at a University and one you would get from EvenHeat or Paragon.
But this post is not just about the relative quality of EvenHeat furnaces. I also have some guidance in how to use the furnaces effectively based on a few simple measurements. And I tested out a method for heat treating that I have seen recommended on forums and Facebook in the past.
The Furnace
The furnace I own is the EvenHeat LB 22.5. I purchased my EvenHeat a few years ago and this is not a sponsored post. The LB models were modified from earlier EvenHeats to remove elements along the back of the furnace. The elements at the back can create a gradient where there is a hotspot in the back and cooler as you move toward the front of the furnace. That gradient can be exacerbated by the heat loss at the door. The LB models have a maximum temperature of 2200°F. There are also KO models with a somewhat smaller chamber that can reach 2400°F. The LB models are 220V, which allows them to heat up more quickly and to rebound more rapidly after temperature loss such as after putting a knife in the furnace. The KH models run on 120V which use an even smaller chamber than the KO but are still about half as fast as the LB models.
Temperature at the Bottom of the Furnace
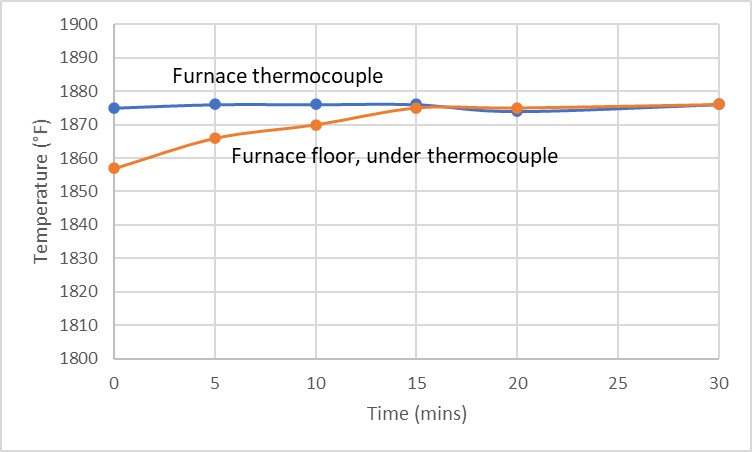
The thermocouple is located near the ceiling of the furnace, while knives are typically placed at the bottom. So the first thing to test was a thermocouple at the bottom of the furnace to compare with the ceiling. This was also a test of how long it takes for the furnace to “equalize” as different positions of the furnace will be somewhat different than the ceiling thermocouple. After the furnace thermocouple reached the target temperature, it took about 15 minutes for the ceiling and floor thermocouples to reach the same temperature:
I next checked to see what happens when you open the door and close it such as when placing a knife inside. I opened the door for 15 seconds, closed it, and then recorded the temperature of the furnace thermocouple as well as my secondary floor thermocouple:
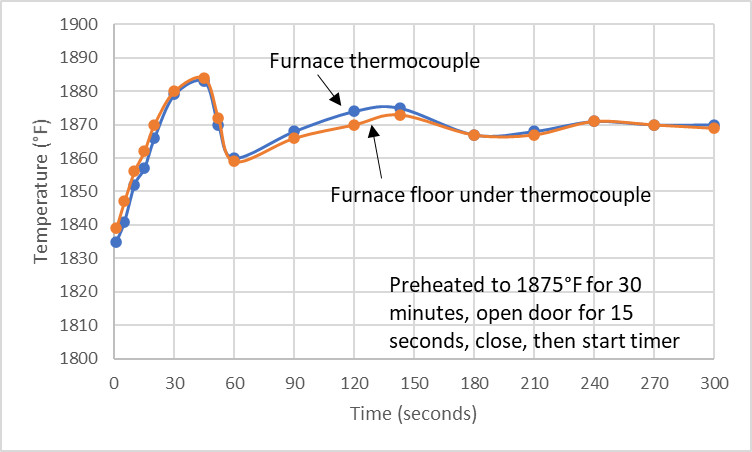
The floor and ceiling remained surprisingly close even after the temperature drop. So if the furnace has equalized before opening the door the floor remained at the temperature the furnace was reading.
Temperature Close to the Door
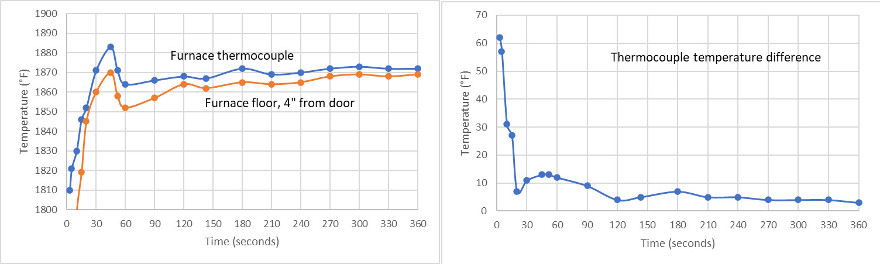
Another concern is the temperature difference near the door where heat loss can occur. Also when you open the door the front of the furnace loses heat more quickly, which is readily apparent just by looking at the color changes. So I was curious if the temperature differential between the floor of the furnace would be acceptable further away from where the furnace thermocouple reads. I moved the secondary thermocouple to 4″ away from the door, about 10″ from the furnace thermocouple. I kept the thermocouple at the floor, so this is a combination of the difference from being at the furnace floor in combination with being near the door.
The secondary and furnace thermocouples maintain a relatively similar delta of about 4-6 degrees by 2 minutes of the furnace door being closed, and continued to decrease to three degrees by 6 minutes. You can see a bit more clearly the difference between the two thermocouples by plotting it out vs time:

Having a difference of less than five degrees is very good, especially when so close to the furnace door. I think the temperature gradient is reasonable. Of course, keeping the knife as close to the furnace thermocouple as possible leads to a temperature as close as possible to the setpoint. So placing the center of the knife at the thermocouple is advised, or perhaps the center of the blade since the blade is probably more important than the handle. If it’s a folder blade the decision is easier. A furnace that is longer than necessary is desirable because the temperature gradient is not as extreme and the area near the door can be avoided.
Creative Furnace Uses
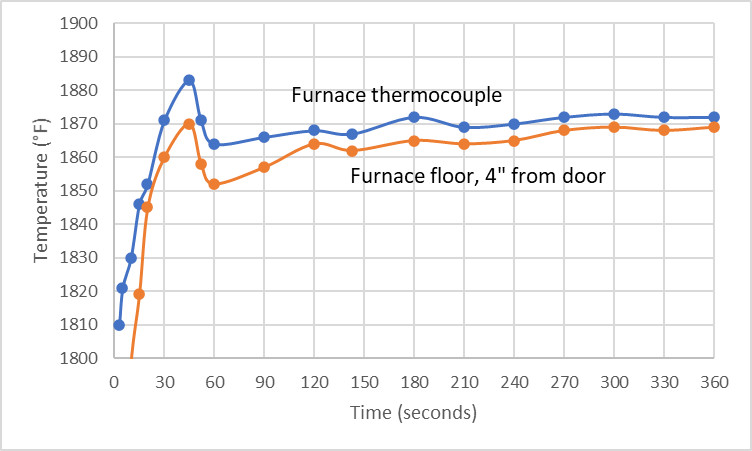
I have seen a few people recommend changing how the furnace is used to compensate for the heat loss when opening the door. I am not 100% sure why they are recommending this, something about wanting to avoid the furnace elements being on when the blade is in the furnace, though maybe different people have different reasons. I placed the secondary thermocouple at the furnace floor again underneath the furnace thermocouple. I preheated the furnace to 1975°F, opened the furnace door for 15 seconds, closed it, and then recorded the temperatures:
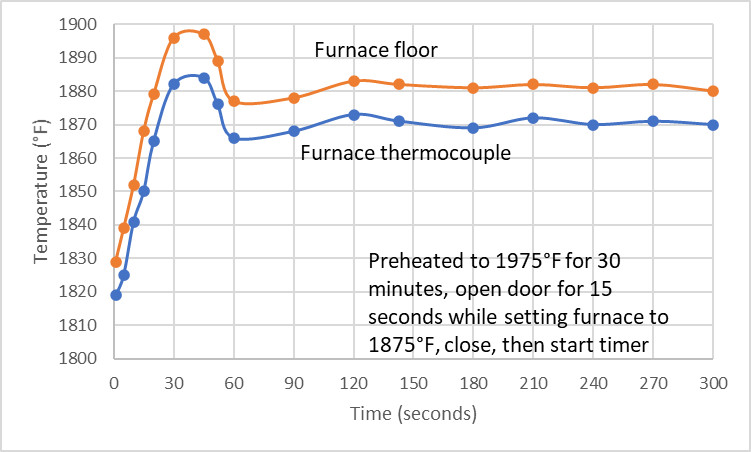
The furnace overshoots more significantly as would likely be expected by equalizing at a temperature higher than our final setpoint. The goal of keeping the elements off is not really met as the furnace turns on to come back up to temp, and then will cycle on and off to maintain the temperature. There is a greater delta in temperature between the floor and the the furnace thermocouple than when we equalized at the target temperature of 1875°F. You can also see that the floor is too hot now from equalizing at the higher temperature.
Preheating and When to Start the Austenitizing Timer
A preheat is recommended in some datasheets to help parts heat evenly. A preheat for a steel austenitized at 2000°F might be at 1600°F which allows the steel to heat through and transform to austenite prior to the final ramp to the higher temperature. Heating straight to 2000°F can become a problem when the steel is transforming. The hotter portion of the blade will transform to austenite, leading to size changes, while the colder part of the blade has not yet transformed. This can exacerbate the possibility of distortion or size changes. You can read more about preheating in this article. Knives are thin enough and simple enough, however, that a preheat is not usually required.
The benefit of a preheat when using a single furnace is that you know exactly when the steel has reached the target austenitizing temperature, there is no need to guess at which point the steel has heated to the furnace temperature. The downside is that the steel is at high temperature for more time leading to more decarb, and also it takes more time overall vs simply putting the knife in a furnace that equalized at the target austenitizing temperature.
When using a separate furnace for preheating, or skipping the preheat altogether, there can be concerns about when to start the timer for the austenitize. The datasheet usually recommends some minimum hold time such as 15 minutes, but this is usually assumed to be the time required after the steel has reached the target temperature. One way to know is simply to look at the knife. This is especially easy when the furnace has a window. When the steel is the same color as the furnace it has reached the temperature. Steel is very conductive so once the surface has reached the furnace temperature so has the center of the blade. Even with steel that is a couple inches thick the delay between the surface and the center is very small. For those without a window you can open the door and check to get a feel for how long it takes. The time is longer for larger blades, especially those with thicker cross section.
However, there is an even simpler way recommended by some metallurgists, which is to start the timer after the furnace has rebounded to the target austenitizing temperature. You may need to add on a couple minutes to ensure the temperature was reached. If the austenitizing temperature is chosen correctly there is little danger of grain growth.
Somewhat counterintuitively, at low temperature the steel reaches the target temperature more slowly than at high temperature, as shown below. So just because you are austenitizing simple carbon steels don’t assume they are heating through more quickly. Note these measurements are for cylinders of a cross section that is greater than a knife, but the principles are the same.
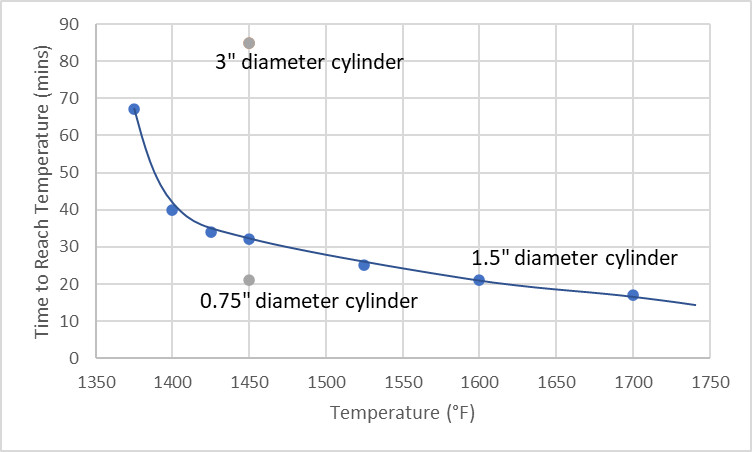
Data adapted from [1]
Tempering in a Heat Treating Furnace
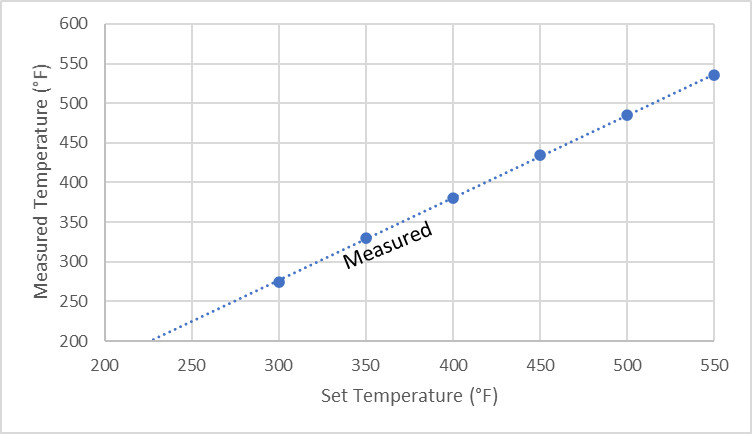
Heat treating furnaces for knives are often calibrated at relatively high temperatures to ensure good austenitization. Sometimes the temperature may be somewhat off at low temperatures used for tempering. I used a thermocouple and an oven thermometer to compare the temperature between 300 and 550°F and found a difference of 15-25°F, with the difference decreasing as the temperature is raised. I recommend using a high quality oven thermometer to ensure that your tempering temperatures are in line with the setpoint. If there is some difference it is easy enough to compensate.
The other thing to remember with heat treating furnaces is they retain heat very well, and that behavior is much more evident at tempering temperaures. If the door of the furnace is left open during cooling from the austenitizing temperature, the furnace will rebound to a much higher temperature when the door is closed. And the rebound can take 30 minutes or even longer. So when tempering in the same oven as hardening you need to ensure it has cooled sufficiently first. Even when heating from room temperature, it makes sense to heat slower for the final 20°F or so, such as at 120°F per hour rather than max ramp. This is because if the furnace overshoots it will take quite some time to cool back down, leading to more tempering than planned.
Conclusions and Summary
The temperature distribution is relatively small in an EvenHeat LB 22.5 if the furnace is equalized for at least 15 minutes. Though the furnace cools significantly when opening the door, the furnace rebounds to an even temperature distribution again after a relatively short amount of time. It is advisable to keep the knife close to the thermocouple to limit the temperature gradient within the knife. Preheating the furnace to a temperature above the target is not advised as it leads to an uneven temperature distribution. Because heat treating furnaces are calibrated to high temperature, the temperature should be checked at low temperatures if used as a tempering oven.
[1] Palmer, F. R., & Luerssen, G. V. (1960). Tool Steel Simplified. Carpenter Steel Company.
This stuff is hard to understand for a layman knife maker. Learning blacksmithing in the late 70’s, I made my first knife with forge heat treating. After years of doing that, I refined my work with newer techniques including a 220v Evenheat. I get a little help out of the article conclusions, but most is hard to understand. I’m certainly no metallurgist.
I think the summary is that the Evenheat is pretty uniform (to within single-digit degrees) at steady state, and that its control system is reasonably well behaved with respect to “typical” disturbances like opening the door and sticking stuff in.
In an ideal world we wouldn’t see those temperature overshoots after opening the door and putting stuff in, but it may be that Larrin’s temperature probe has a faster response than the one in the oven, or that they intentionally underdamped the control loop a bit to get faster response at the expense of uneven settling. As a former controls person I consider that sort of overshoot to be the sort of “sloppy” work that I would have sniffed at a bit as a professional, but as a practical matter I appreciate this as a well-tuned and solidly usable system. They probably could have gotten somewhat better looking performance by using feedforward or some sort of adaptive gain system that “learns” the thermal inertia of the oven’s contents, but it isn’t necessary.
Speaking of thermal inertia, one thing I would have tried that Larrin doesn’t seem to is to stick an obscenely large mass of metal in the oven and see how it responds. Doing so changes the thermal inertial of the system (in control parlance the “plant”) and can tell you a lot about the quality of the controls scheme.
Either way a 10-degree overshoot lasting half a minute isn’t going to break anybody’s heat treatment – if you’re that close to the edge then you’re not making sufficient allowance for compositional variation or any of a number of other sources of variation.
Those overshoots after closing the door are typical of PID control loops. The integral term builds up to its limit (they’re almost always clamped for exactly this reason) while the door is open, and that causes overcorrection once the heat loss is removed. This furnace is very responsive and well behaved overall though. They obviously put some work into tuning the gains and limits. I used to do controls as an ME/CS/systems engineer before I shifted purely to SW…