Thanks to Mike Poutiatine, TWJC, Robert Hugh, Head VI, and Snackin for becoming Knife Steel Nerds Patreon supporters! I was able to purchase a forge to do these experiments with thanks to the contributions of supporters.
Video Version
The general information in this article also exists as a YouTube video for those that prefer to consume their information that way:
Importance of Prior Microstructure
In a previous article I wrote about how to normalize and anneal steel after forging but before the final steps of austenitizing, quenching, and tempering. One of the things that I pointed out in that article was that using a normalized, pearlite microstructure to heat treat from would lead to very rapid response to heat treatment. An annealed structure such as comes from the manufacturer takes more time, and higher temperature, to properly austenitize the steel. Below shows the resulting as-quenched hardness for 1084 and 52100 comparing normalized and annealed steel. These were all quenched from approximately where they became nonmagnetic (1385°F for 1084 and 1445°F for 52100), relatively low in temperature compared with the typically recommended temperature for heat treatment.
1084 hardness:

52100 hardness:

The high hardness after quenching 52100 from such a low temperature is impressive because of the relatively high chromium (1.5%) of the steel. Higher chromium delays transformations in the steel and typically 52100 is a steel that is thought to require higher temperatures and soak times. However, if starting from a pearlite structure it can be quenched from nonmagnetic and still be heat treated “properly.” This large difference in austenitizing response is also shown in the literature, such as in the study shown below comparing pearlite and spheroidized structures in 52100. You can see that the hardness is at its maximum in less than a minute with the pearlite structure while it takes over 2 hours to reach the same hardness with a spheroidized structure.
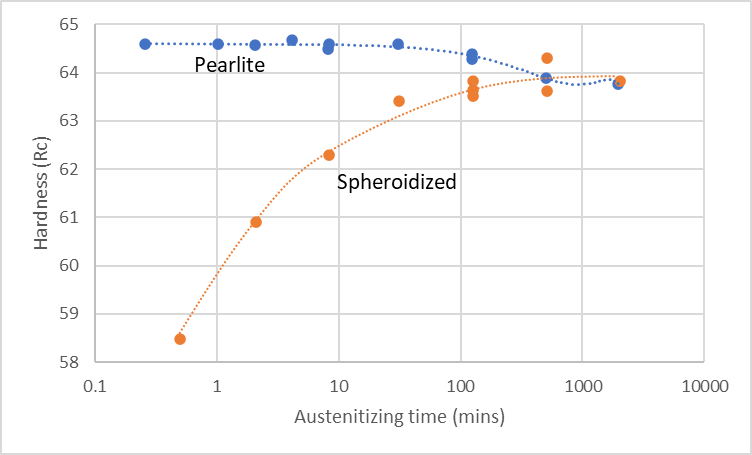
52100 steel austenitized at 840°C/1550°F, quenched in oil, and tempered at 175°C/350°F [1]
This occurs because the distance that diffusion occurs is much shorter with a pearlite structure then with a spheroidize annealed structure. See the simplified schematic below where the pearlite (lines indicating the cementite structure) vs spheroidized carbides (black circles) where you can see that the distance between those features is much greater with spheroidized cementite/carbides.
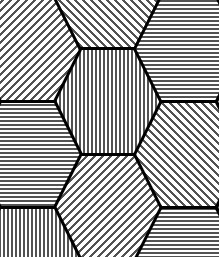
Pearlite (normalized)
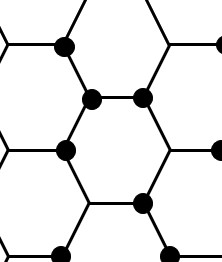
Spheroidized carbide (annealed)
Heat Treating in a Forge
This is useful because typically when bladesmiths heat treat knives in a forge they are trying to get to a temperature at some point higher than nonmagnetic and this is a major source of variability. I figured if we use a normalized structure instead I could heat to nonmagnetic and quench without trying to reach a higher temperature that can’t easily be measured with a forge running at high temperature. There are various methods for heat treating in a forge such as using a muffle, or pipe, within the forge to help maintain a more even temperature distribution. However, I wanted to use the simplest method used by many beginning bladesmiths with a simple forge to heat the steel and checking for temperature with nothing but a magnet. If I could successfully heat treat in this way then I would have more confidence in recommending to people methods of how to heat treat with a forge. In the past I have always recommended against heat treating in a forge because a furnace is so much more controllable and consistent. However, I wanted to prove myself wrong in a sense by seeing if I could heat treat in a forge without any past experience with doing it.
I chose a range of different low alloy steels typically used by forging bladesmiths. I wanted to do different steels to make sure that the process worked with different carbon and alloy content. With each I overheated the steel at 2100°F/1150°C for an hour to simulate forging, normalized at 1550-1700°F for 10 minutes and air cooled. The normalizing temperature varied by steel. This was the condition that I used when heating to nonmagnetic in the forge and quenching in Parks 50. These were all 1/8″ pieces of steel.
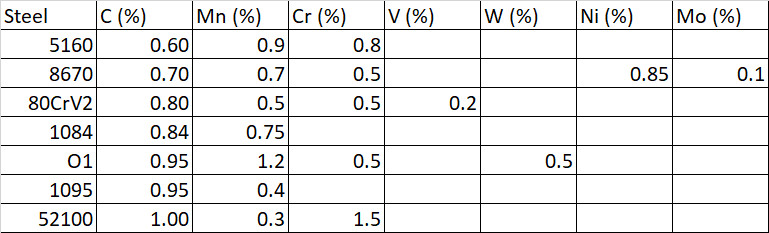
Because of the different compositions of these steels the hardness of the normalized steel varied though I was able to cut all of them with a bandsaw and drill a small hole. A very high hardenability steel like L6 or thinner steel like 1/16″ may air harden enough where bandsaw cutting or drilling may be difficult.
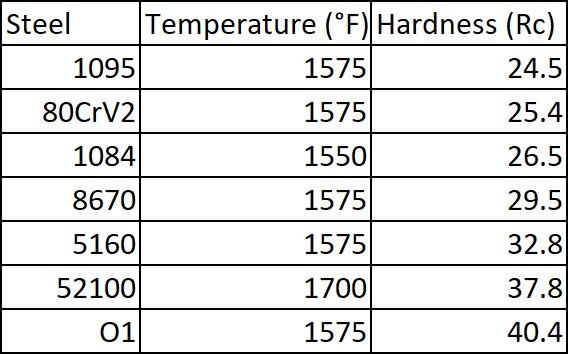
Hardness of normalized steel
Magnetism and Heating Rate
The steel becomes nonmagnetic when it has transformed to austenite, a nonmagnetic phase of steel. There are certain steels, notably austenitic stainless steels, which are designed to be austenite at room temperature and are therefore nonmagnetic at room temperature. These are not used for knives but I am giving an example for better understanding of magnetic/nonmagnetic behavior. Fortunately for us with normalized pearlitic steel, it becomes nonmagnetic when the pearlite has been replaced with austenite and is ready for quenching. With annealed steel it will also become nonmagnetic when it has transformed to austenite, but the higher required temperature is to get more carbide to dissolve and to put more carbon and alloy in solution by dissolving those carbides. With the pearlite starting condition there is enough carbon in solution immediately after the pearlite has been replaced with austenite (see the previous chart of 52100 hardness vs time for pearlite and spheroidized carbide).
Different steels will transform to austenite at somewhat different temperatures but we don’t have to worry about that because we are checking with a magnet; when the steel has transformed we see that with the magnet. Another potential concern is that the transformation temperature can change based on how rapidly the steel is heated. Faster heating means the transformation is delayed to a somewhat higher temperature. Steel can heat relatively rapidly in a forge so the transformation may be shifted up a few degrees. However, we are checking with a magnet so once the steel has transformed we quench from there regardless of the temperature where that has actually happened. (Note: The dissolution of all of the carbide/cementite is not shown on the diagram.)
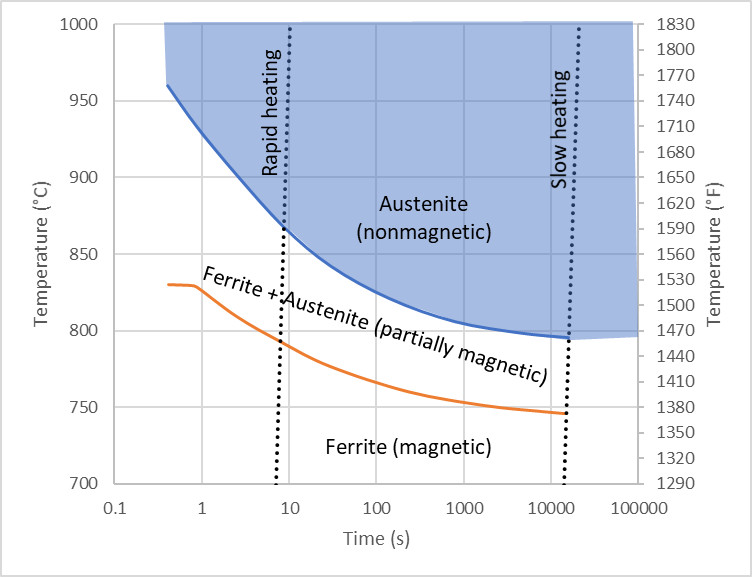
52100 transformation temperatures with continuous heating at different rates. Adapted from [2].
However, while with continuous heating the transformation is shifted up, if the steel is held at that temperature for a period of time the transformation will occur at a lower temperature. Therefore if the relatively fast heating of a forge leads to an increased temperature of transformation, attempting to hold the steel at that temperature may lead to the steel being overheated.
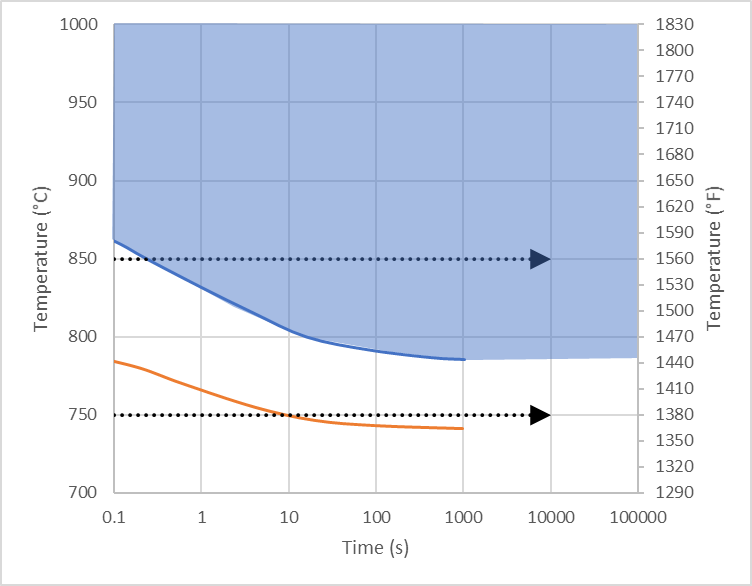
52100 transformation temperatures with holding at a constant temperature. Adapted from [2].
Dangers of Overheating
Grain Growth
Bladesmiths are generally familiar with the problem of grain growth with overheating. Larger grains in steel usually means reduced toughness. If the grain size is big enough the steel is brittle and will chip or break easily. This can be evaluated based on fracture appearance if the steel is broken in a brittle condition, ie as-quenched steel that isn’t tempered. Ductile steel that is fractured does not reflect the grain size of the steel, which is why normalized steel cannot be used to evaluate fracture grain. Below shows 1084 which was heated for 10 minutes, quenched, and broken.
1475°F (800°C)
1700°F (925°C)
2000°F (1095°C)
Carbon in Solution
However, grain growth is not the only danger of overheating. When too much carbide is dissolved putting excess carbon in solution toughness is reduced. Above about 0.6% carbon in solution the type of martensite starts to transition from “lath” to “plate” martensite. Plate martensite is brittle and prone to microcracks. A 1% carbon steel does not necessarily have 1% carbon in solution. The steel is generally austenitized at such a temperature where some carbon remains in carbides.

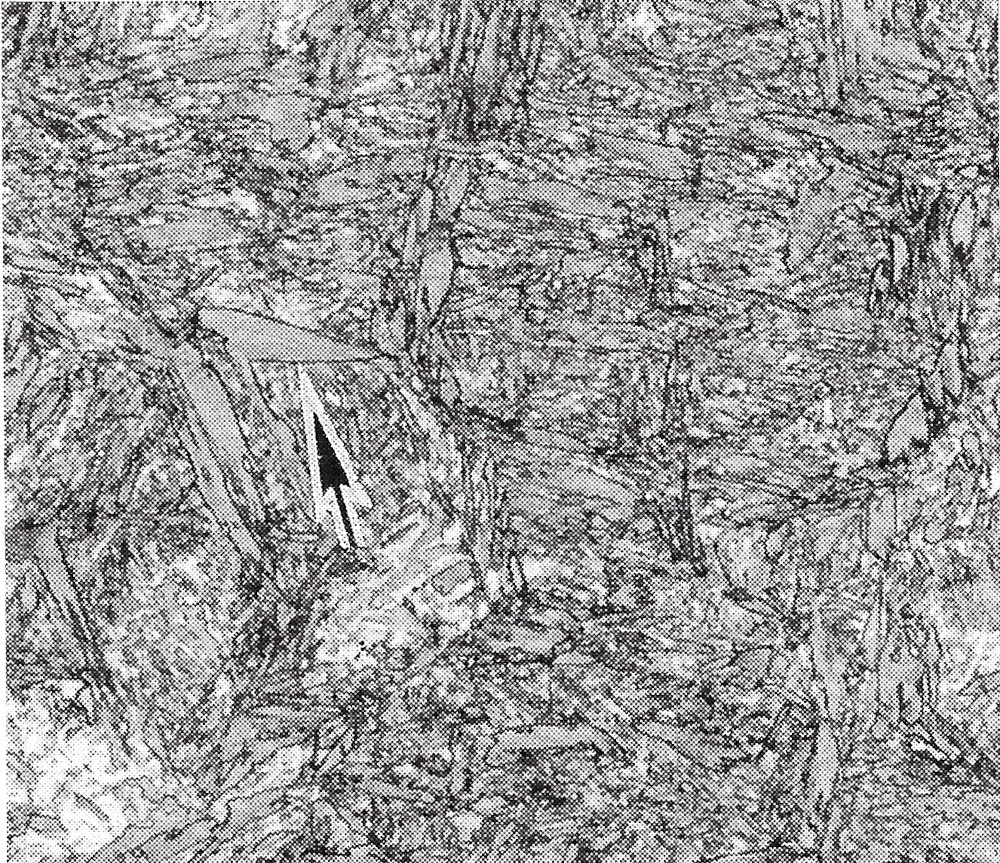
The arrow points to plate martensite within a matrix of primarily lath martensite [3]
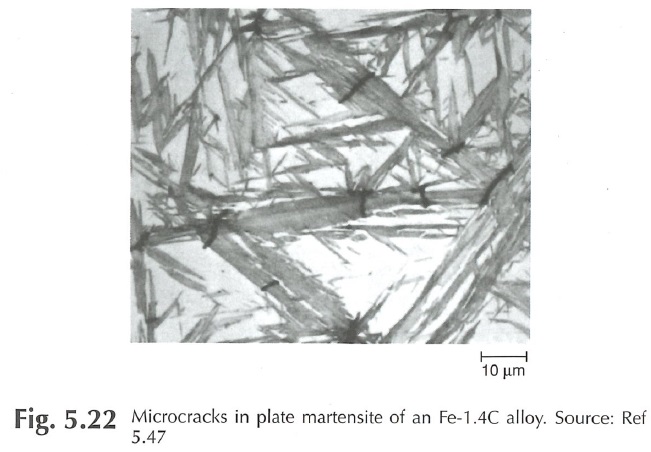
Image from [4]
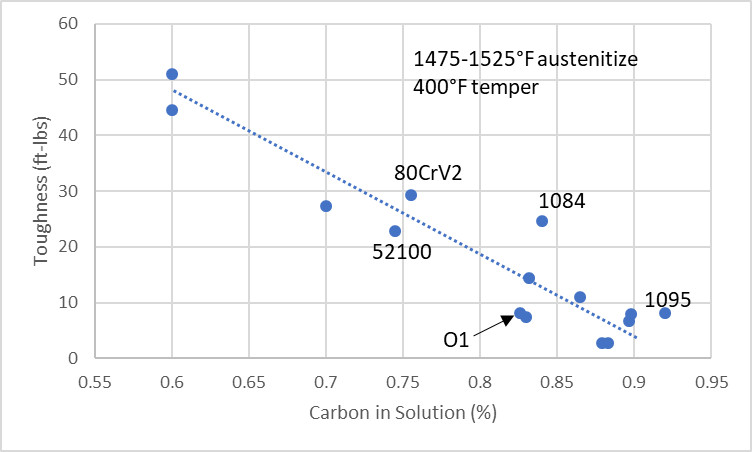
I also compared the toughness of low alloy knife steels in this article where I also used calculated carbon in solution to compare them. The trend was pretty convincing, showing how important this factor is for knife steel toughness, particularly in low alloy knife steel where carbon in solution is not as easily controlled as in high alloy steels.
Results of Forge Heat Treatments
So I heat treated these steels in an Atlas Forge with the propane set to very low pressure. This is still at relatively high temperature, approximately 2000°F/1095°C. I heated them up to a consistent temperature the best I could while occasionally checking with a magnet. When the steel was nonmagnetic I quenched in Parks 50. The samples were then tempered twice for 2 hours at 400°F/205°C. I tested the samples for hardness and also toughness using my standard unnotched subsize charpy specimens.
5160 and 8670
These steels are the lowest in carbon that I tested with these experiments. These steels are also among the highest toughness that I have tested, see the chart below for low alloy knife steels. I have separate articles about the heat treatment of these two steels:
In my forge heat treatments of 5160 and 8670 I measured similar hardness and toughness to the furnace heat treated specimens:
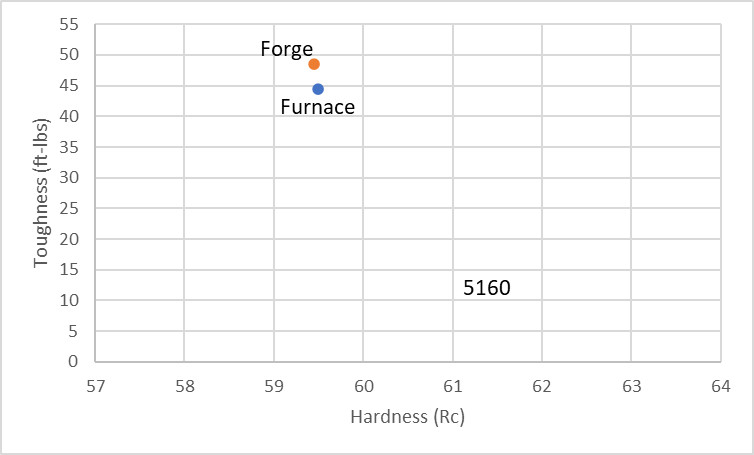
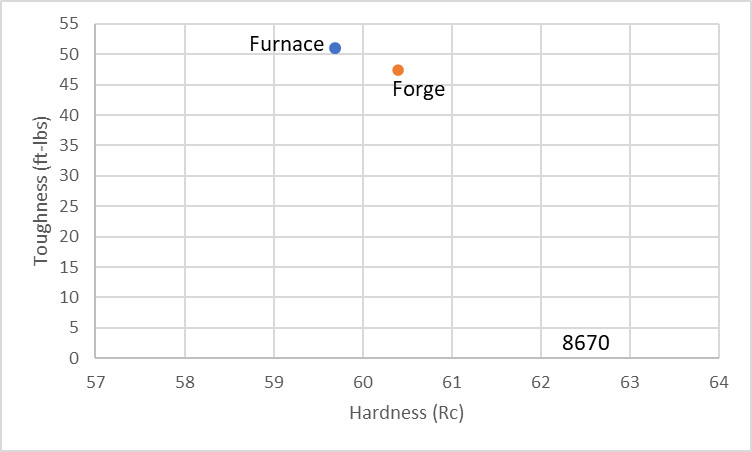
This indicates that the steel was both sufficiently heated (similar hardness to the furnace heat treated specimens) but not overheated (similar toughness). In furnace heat treatments of 5160 we found that when using temperatures of 1550°F or above the toughness was significantly reduced from grain growth. This gives a relatively wide window when forge heat treating between nonmagnetic and excessive grain growth when using normalized steel, as it becomes nonmagnetic at least 100°F below that point.
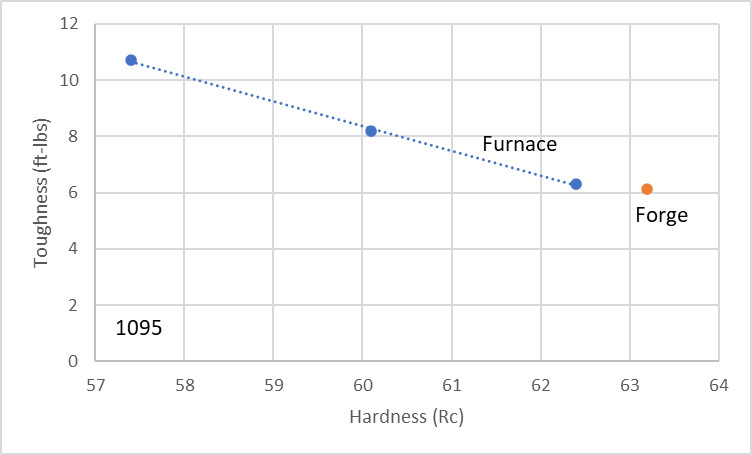
O1 and 1095
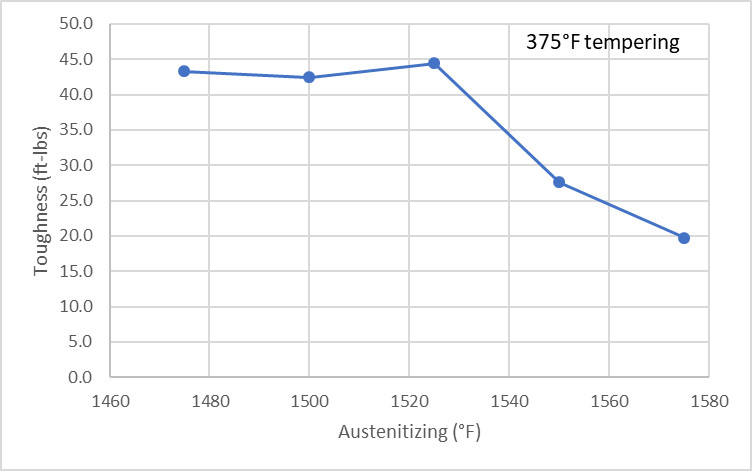
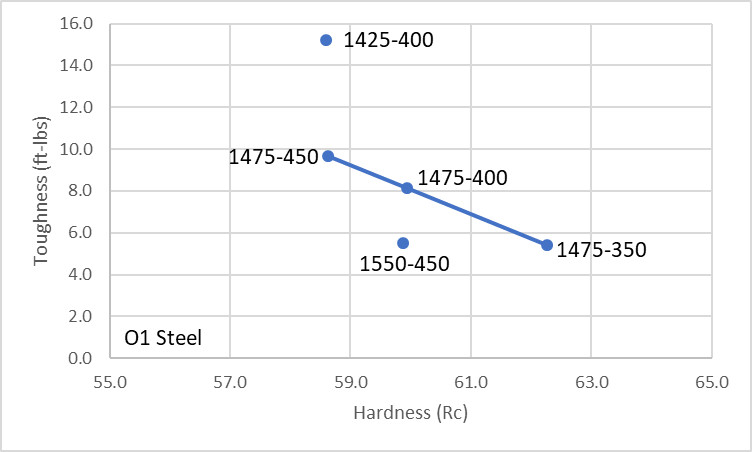
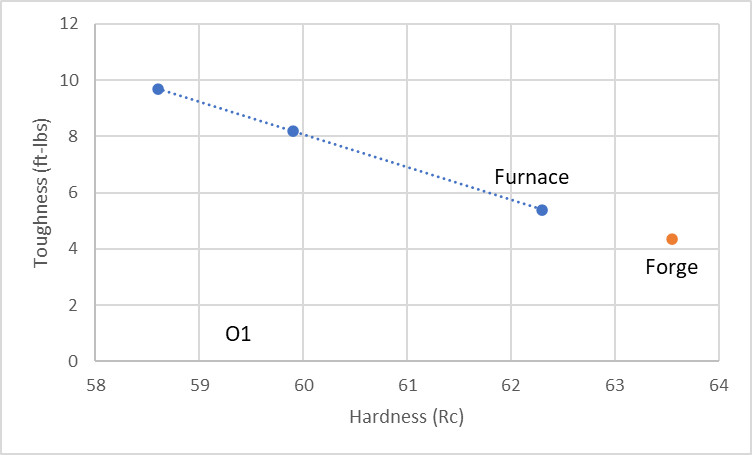
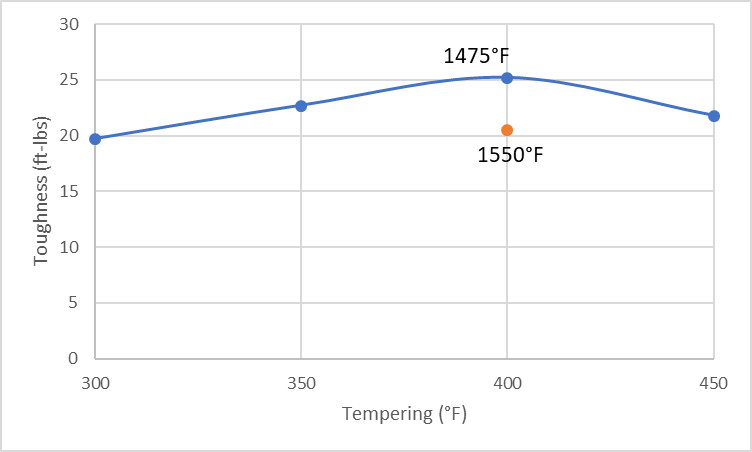
With the relatively low carbon content of 5160 and 8670, excessive carbon in solution is not as much of a potential problem with overheating. Instead we are primarily concerned about grain growth. However, with high carbon steel the effect of carbon in solution is much more significant. This is why the toughness of O1 and 1095 is so much lower than 5160/8670 in the low alloy steel toughness chart. Sometimes using reduced austenitizing temperatures with high carbon steels can result in improved toughness because of the reduction in carbon in solution (less carbide dissolved). See below where austenitizing O1 at 1475 and especially 1425°F resulted in superior toughness when compared with 1550°F even after compensating for hardness.
This was also an important topic when comparing the toughness of low alloy steels with a heat treatment for bainite, as bainite does not have the carbon in solution problem that plate martensite has. This resulted in higher toughness for O1 and 1095 with austempering treatments for bainite because of the elimination of plate martensite.
1475°F is the typical temperature recommended for furnace heat treating in these steels, so this is the comparison I made with the forge heat treated specimens. In this case the hardness was somewhat higher for my forge heat treated coupons but the hardness-toughness balance was similar to the 1475°F furnace heat treated coupons. So this is a good result I think.
52100
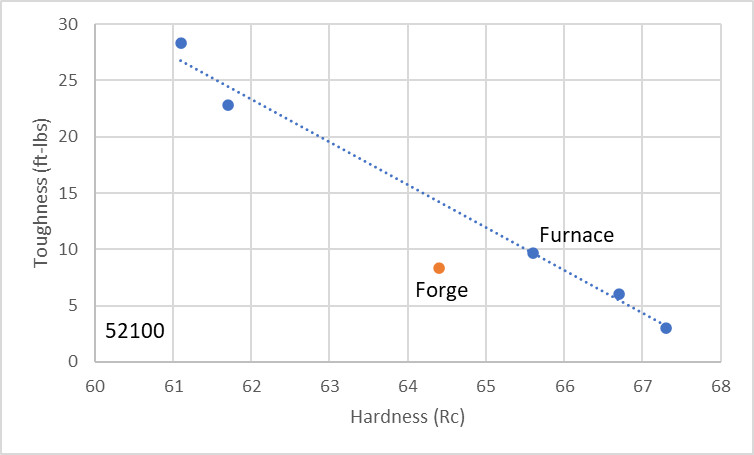
With 52100 the furnace heat treated coupons have significantly better toughness than furnace heat treated O1 and 1095. The chromium addition reduces the carbon in solution for a given austenitizing temperature and makes controlling the carbon in solution easier. This gives 52100 excellent toughness and wear resistance when compared with other high carbon low alloy steels. However, this is for furnace heat treating from a spheroidized annealed condition. When heat treating from pearlite you do not have the same control over the carbon in solution and the resulting as-quenched hardness, as shown below.
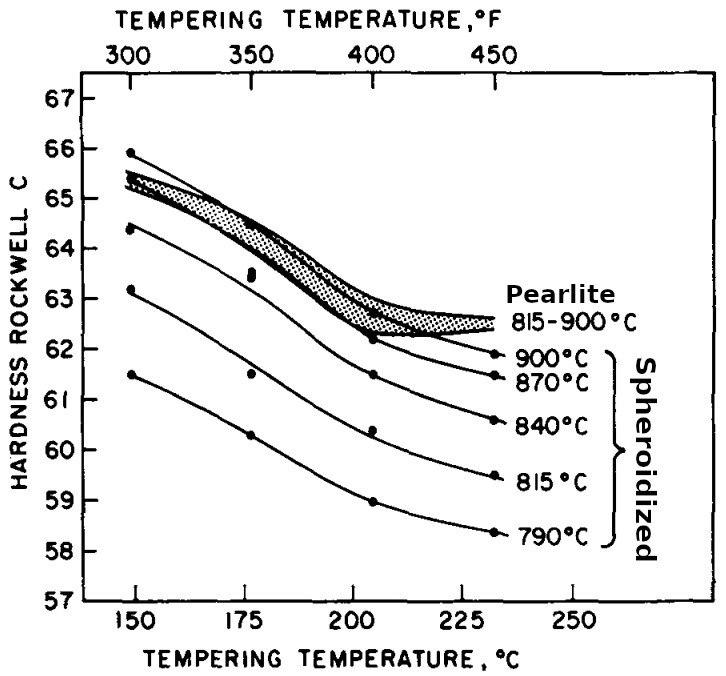
Chart adapted from [1]
However, 52100 would be the most difficult to heat treat in a forge from the spheroidized annealed condition because of how sluggish the dissolution of carbide is. And even if that was effectively done it would be difficult to target specific temperatures as with a furnace. So like with 1095 and O1 you are limited to relatively high hardness. You could temper higher than 400°F but then you would run into the issue of tempered martensite embrittlement where hardness is reduced but toughness also goes down. This was seen when heat treating 52100 with a 450°F tempering temperature, see this article on heat treating 52100 for more.
The toughness of the 52100 forge heat treated specimens was still good, with higher toughness than O1 and 1095. However, the toughness was somewhat worse than other high hardness furnace heat treated 52100. This may be because of greater carbon in solution from the pearlite starting microstructure. The other high hardness coupons from furnace heat treating used lower tempering temperatures (300°F/150°C) in combination with lower carbon in solution. However, as I said the properties are still reasonable and would do well for thin, high performance knives.
80CrV2 and 1084
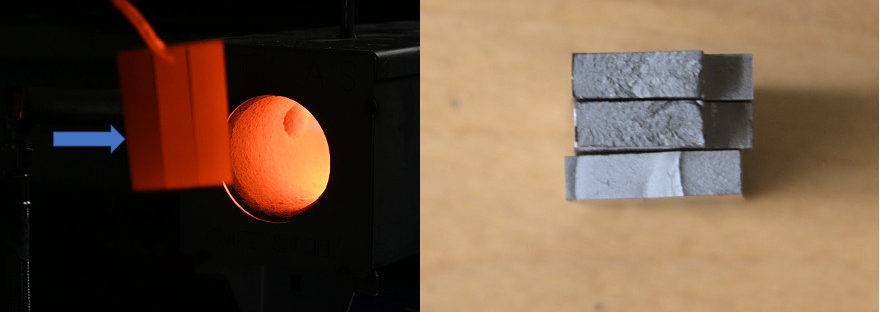
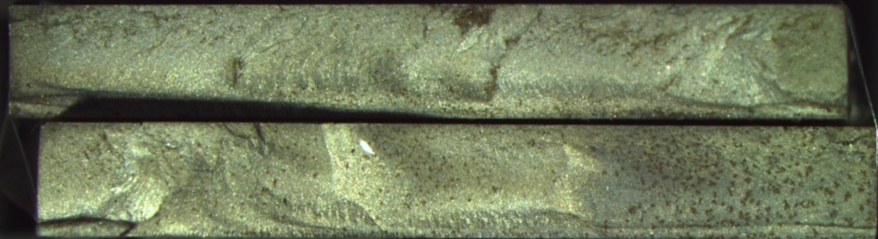
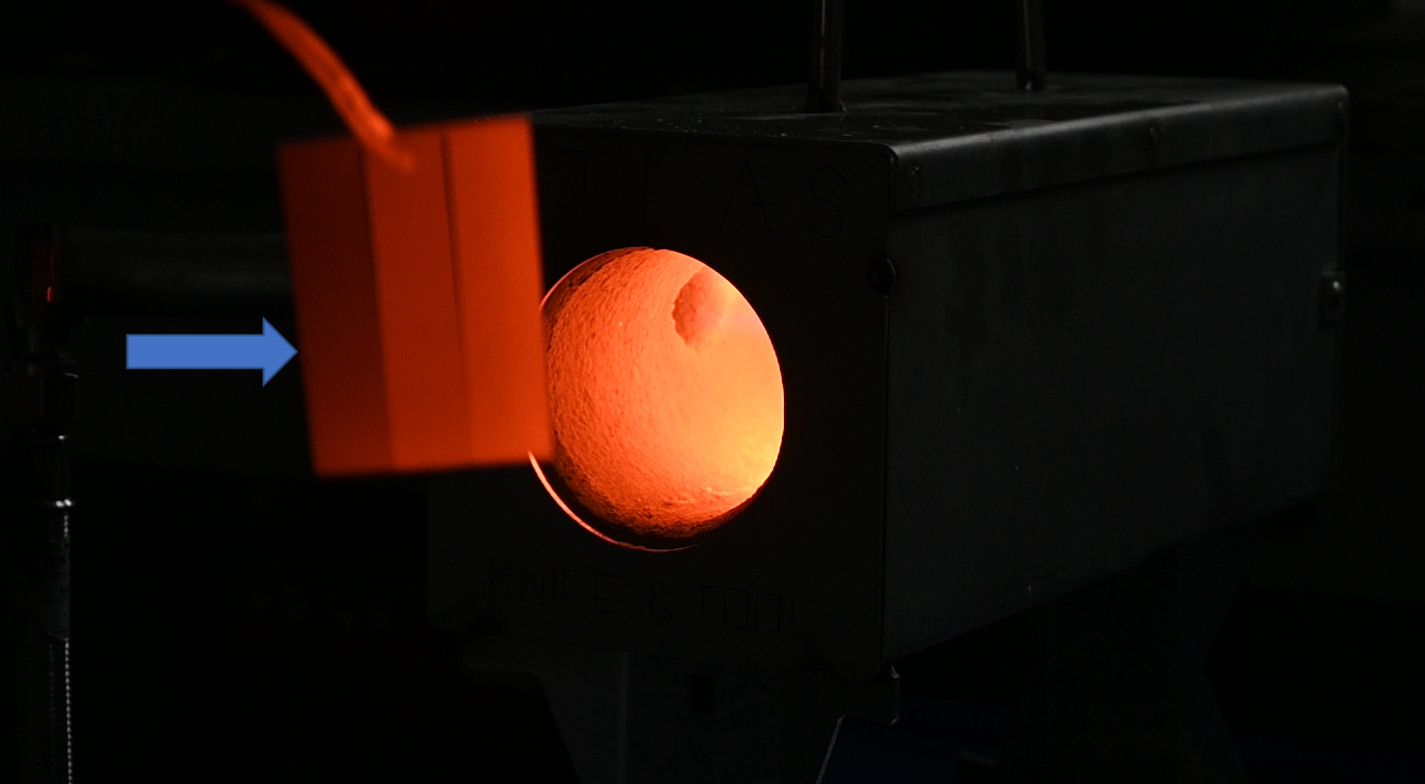
I saved these two steels for last because they are in between the medium carbon (5160/8670) and high carbon (1095/O1/52100) categories described above. They therefore have behavior that is basically in between those two categories. 1084 is known as being very easy to heat treat in a forge because of its low alloy content and good hardenability (doesn’t have to be quenched as fast as 1095). Using a pearlite starting structure in all of the steels I have heat treated does somewhat remove the advantage 1084 has from the low alloy content, however, as all of these steels hardened from nonmagnetic just fine. Ironically, 1084 gave me the most trouble in heat treating because two of the coupons had lower toughness than the third. This was because I was having trouble heating the piece evenly and had a hot spot on one side of the steel, as shown in the image below, which is from video footage of me heat treating the specimens:
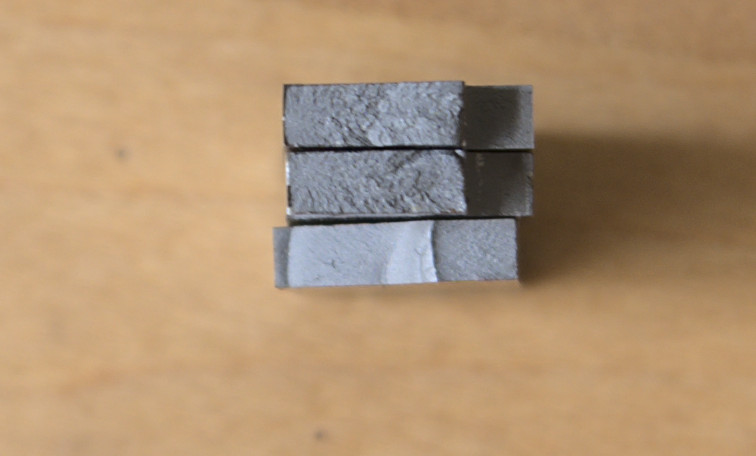
So to get the entire piece to reach nonmagnetic I ended up overheating those two hotter specimens resulting in grain growth and reduced toughness. This was also visible in the fracture grain of the specimens, though it was not as bad as you might think based on the reduction in toughness (remember these are only 10 mm wide):
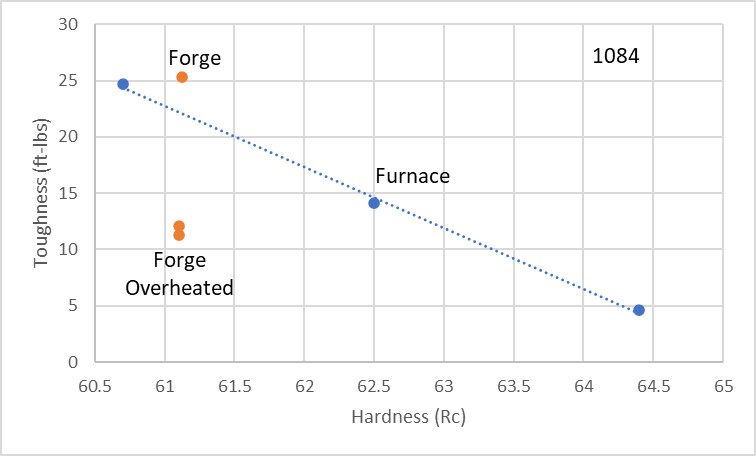
This overheated treatment of 1084 would still result in an acceptable knife; there are many steel-heat treatment combinations used in common knives with lower toughness. However, we would of course prefer an optimized heat treatment rather a subpar one.
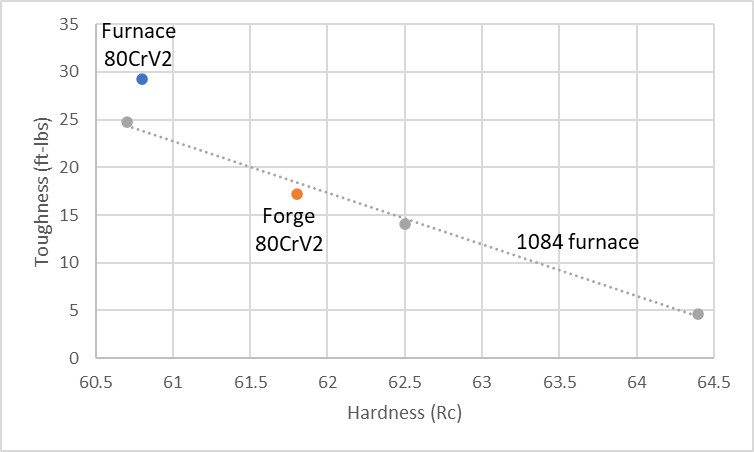
For 80CrV2 the toughness was somewhat lower than the furnace heat treated specimen. However, the hardness was also higher. So to have some idea of how it compared I overlaid the toughness of the furnace heat treated 1084 coupons since I don’t have a trend for 80CrV2. When viewed against the furnace heat treated 1084 the hardness-toughness-balance of the forge heat treated 80CrV2 looks pretty good.
Overall Trends
Because I heat treated from a pearlite microstructure rather than spheroidized annealed, and all of them were tempered at 400°F, the resulting hardness and toughness was primarily controlled by the carbon content of the steel, as shown below:
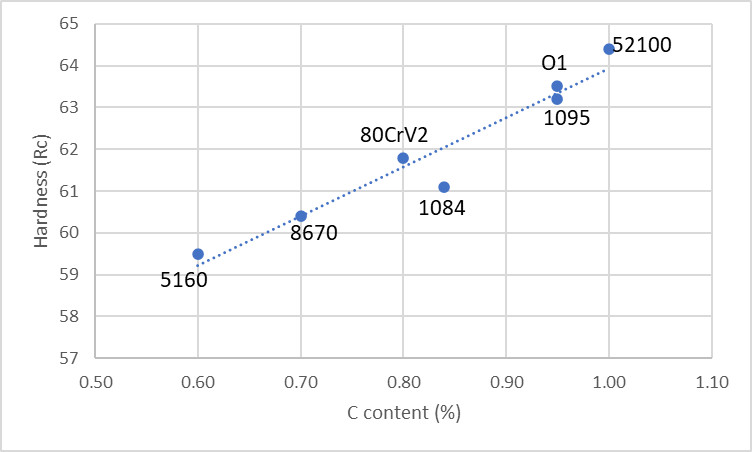
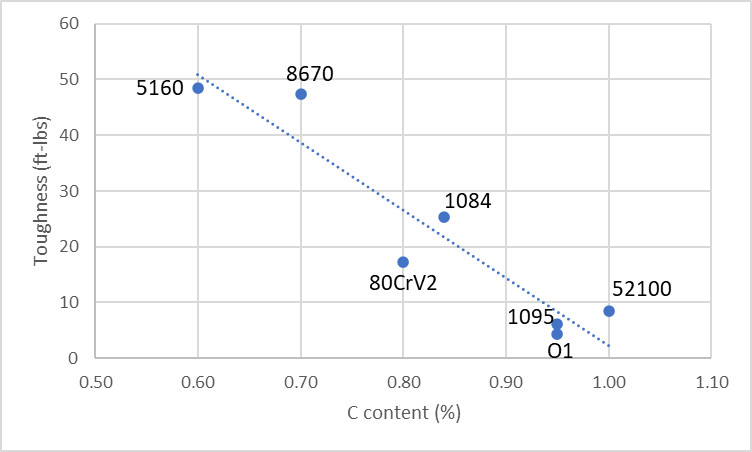
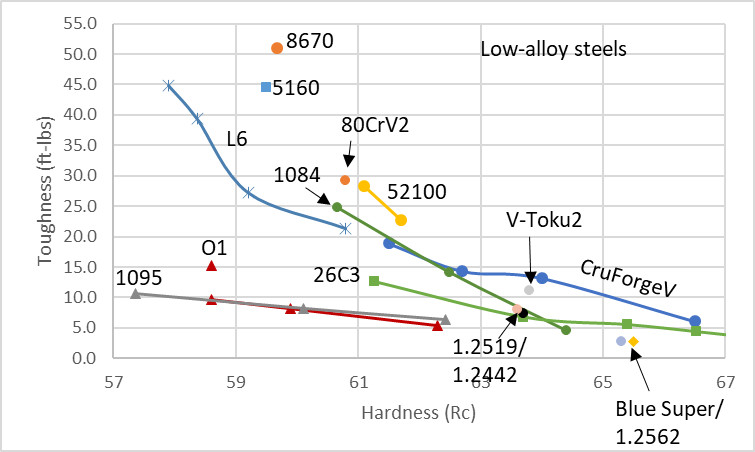
And then if we plot the hardness vs toughness balance you can better see where the different steels ended up in their overall properties:
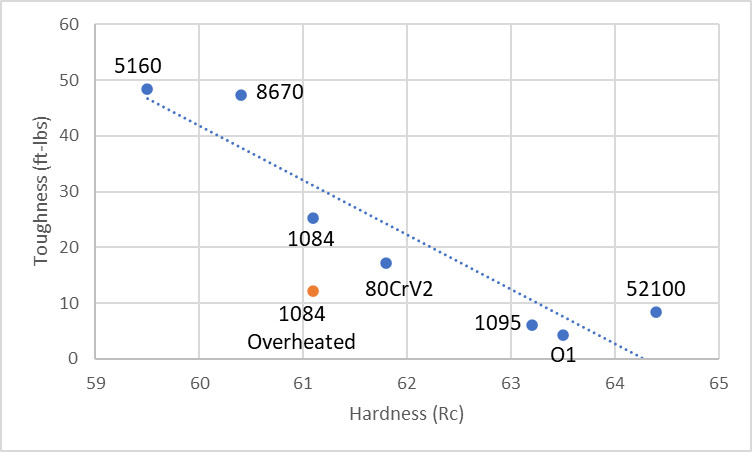
So 5160 and 8670 would be best for knives requiring high toughness like heavy choppers. The medium carbon content gives them good hardness (58-60 Rc with a 400°F temper) without having significant issues with high carbon in solution and plate martensite.
1095, O1, and 52100 would be best for fine cutting knives like kitchen knives. Though 52100 did have better hardness and toughness than 1095 and O1 so it would be my choice. And 52100 has better edge retention than either of those steels.
1084 and 80CrV2 would be best for general purpose knives. Their medium-high carbon content gives them somewhat more hardness/strength and edge retention while still having very good toughness.
Should You Heat Treat in a Forge?
With furnace heat treating, however, you would have somewhat more control over the final properties of the steel and the steels would be more flexible in heat treatment for achieving different properties. 52100, for example, can have toughness as high as 1084/80CrV2 at similar hardness with the added benefit of more carbide for higher wear resistance. So with this type of forge heat treating the steel selection is very important for the type of knife that will be used, without being able to rely as much on changes to heat treatment. However, I did get decent properties with all of these steels with forge heat treatments, and these were the very first coupons I had ever heat treated in a forge. So can you get good results heat treating in a forge? Yes. I attribute this to the use of the normalized, pearlitic microstructure that meant I could quench from nonmagnetic without worrying about how much hotter to go.
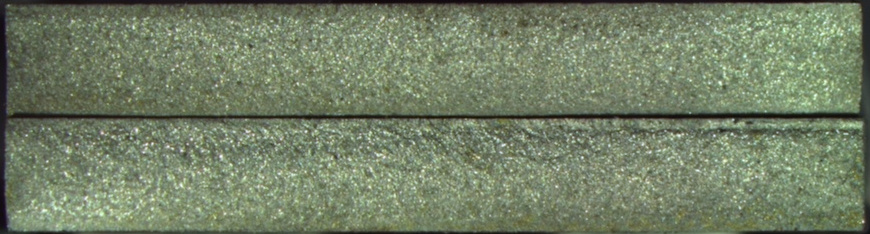
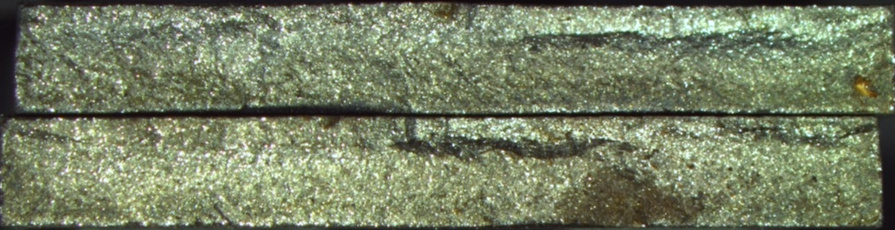
The biggest dangers for forge heat treating are overheating for grain growth and excessive carbon in solution, as well as uneven heating leading to spots that are higher/lower in hardness or toughness. The problem of uneven heating can only be fixed with practice which is why I would still recommend that beginner knife makers send out knives to a professional heat treater if a furnace is not yet in the budget. Furnace heat treating is very easy and results in the same properties each time. You can follow recommendations from this website, datasheets, or my book Knife Engineering. Just follow the recommendations and the performance will be good even if you are a novice. The chances of screwing up a forge heat treatment are much higher. One example I gave in my last article was where a knifemaker sent me a whole range of different coupons heat treated in a forge, and he even used the muffle method with a thermocouple to try to have more even heating and more consistent temperature. The samples were obviously overheated according to the fracture appearance, and the toughness was very bad. So there are fewer guarantees with forge heat treatments.
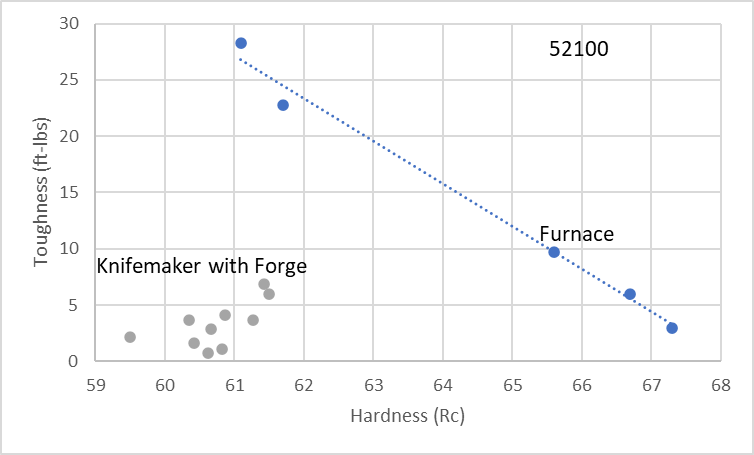
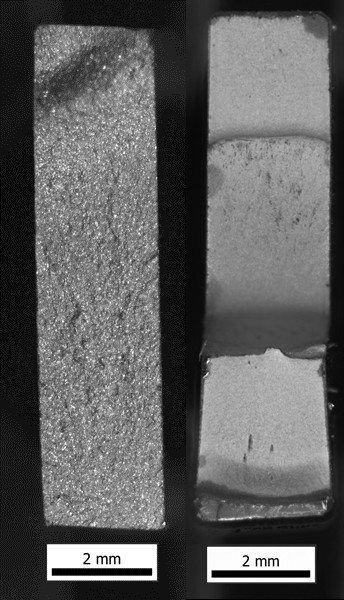
Properly heat treated 52100 on the right and improperly heat treated 52100 on the left
High Alloy Steels and Stainless Steels
All of these examples were with low alloy steels generally used by forging bladesmiths. The method of heat treating normalized steel and checking with a magnet would not work for high alloy tool steels, high speed steels, stainless steels, etc. Basically any steel with 3% chromium or more. I have not attempted to heat treat any of those in a forge and the methods required to do so would be different.
Summary and Conclusions
My goal here was to prove to myself that good forge heat treatments can be done by a novice and that goal was achieved. There are still potential pitfalls to forge heat treating, with overheating and uneven heating being the most common. If you follow my recommendation to use a normalized, pearlitic microstructure, heat to nonmagnet and no hotter. It can be easy to heat significantly above nonmagnetic which will result in reduced toughness. I still recommend furnace heat treating or sending out to a professional heat treater for most people. That way you can have confidence in consistent, repeatable results. And furnace heat treating is just easier.
[1] Stickels, C. A. “Carbide refining heat treatments for 52100 bearing steel.” Metallurgical Transactions 5, no. 4 (1974): 865-874.
[2] Orlich, Jürgen, Adolf Rose, and Paul Wiest. Atlas zur Wärmebehandlung der Stähle;: Band 3: Zeit, Temperatur, Austentisierung, Schaubilder. Matplus GmbH, 1973.
[3] Samuels, Leonard Ernest. Light microscopy of carbon steels. Asm International, 1999.
[4] Krauss, George. Steels: processing, structure, and performance. Asm International, 2015.
If a forge heat treater wants to have an idea of how hot his forge is in different areas and gas flows try using Tempil Markers like my brother did at first on his big forge. They come in 25 degree ranges from 125 to 375 then 50 degree graduations, (calibrate your house/tempering oven) from 400 to 1800 F. So a good range to get would be the steels you intend to heat treat, like a 1400 then 1450 to tell you you’re past non-magnetic beyond a doubt. Then a 1500 if doing steels in that range of 1450-1500 and then a 1550 to see if you went too far plus a 1600 because they’re so cheap. They are $10.99 a marker and $44-55 is cheap to learn your heat colors. Make a clip-on steel shield to cover the top of the marker to prevent a hot blast from melting it, plus you’ll only have to pull the knife halfway out to check it thus losing no heat.
I also must add to wear tinted safety glasses because continued looking into what is essentially a blast furnace will cause eye damage over time. Pull your knives out and check them with your bare eyes, but don’t stare into a forge without tinted glasses, yellow is good or a light copper tint. I have a green tinted face shield. Your night vision will thank you.
if the forge is in the same place with the same light conditions, you can get a reasonable estimate of nonmagnetic color just by testing with a magnet and probably get within 100 degrees or so without any issue.
Nothing wrong with tempilstiks, though. The challenge with a forge is to adapt thermal cycling information and things of the like to refine grain, because my experience is going above nonmagnetic and back will lead to some grain growth and then it will be stable.
For anyone to use a forge for heat treatment, though, other than the fact that they’re not going to be able to soak open atmosphere at 1900F with stainless steels to melt chromium carbides (wrapping and then doing that is just too hard relying by eye, etc), there’s no replacement for experimentation and then not changing variables.
I used to think it would be difficult to cycle grain smaller than what comes in a file (these are 50x optical).
The first is a file (sorry for the blur, they didn’t all break into neat flat surfaces):
https://i.imgur.com/CgnLghi.jpg (it almost looks as if they’re untempered, and they break like it.
Next, 1095 taken above and below magnetic three cycles (the grain got more coarse than just using flat stock as delivered, but only slightly):
https://i.imgur.com/XcQqRj2.jpg
Then, another piece of stock cycled by eye and with a magnet to not quite get to nonmagnetic – cycled four times (same 1095 bar, all other than the file cut from adjacent pieces)
https://i.imgur.com/fAEI7Xk.jpg
And then finally, a control piece that was left in the back of the forge more or less a color above magnetic for 10 minutes (as in just a little too hot, but to gather just how bad the grain would be if the 1095 test piece was allowed to get to a low-mid orange in normal interior unlit environment).
https://i.imgur.com/EDaU2Kx.jpg
(not nearly as big as some of the grain shown on forged in fire, etc, but it never got more than just a little too hot).
The thermally cycled piece was heated only quickly to more or less nonmagnetic plus one color (so instead of the dull orange, heated to a step brighter uniformly and then quenched – so as not to have the time for grain growth, but to also not have failed hardening).
The key in this case is without experimentation (cycling in the forge above magnetic, even only just), the result isn’t as good. Going just short yields finer grain, but it seems like there’s no secret going on – some of the steel is probably transitioning to nonmagnetic but I’m cutting it off before it’s completely nonmagnetic.
Parks 50 in all cases, including the sub-critical seeming thermal cycling quenches.
infrared glasses are a good idea for heavy grinding, forging, etc. It’s pretty easy to notice eye strain and tiredness if not using them (and they don’t cost much, as you say).
Inevitably, there will be people like me who don’t want the expense or the time involved with oven cycles, but I couldn’t read what someone else said other than general ideas and beat the file steel fineness – it required experimenting (and then destructive testing items made – chisels in this case. The ones that get the subcritical thermal cycle hold up a little better – both that and the heated and quenched without cycling types work fine, but the ones that are cycled do a little better, and the rougher the testing gets, the ‘mo betta’ they do.
Hi Larrin
Good article, congrats on your new furnace.
It’s interesting that you are heating from lower temps as that produces a much finer grain size. If one is heating from the annealed state and slightly above Ac3, it takes at least an hour of hold time for things to get completely in solution. If heating from a normalized structure the Ac3 is reduced a bit and hold time is shorter as more carbon is available. If heating from a martensite state, then Ac3 is reduced even further and hold time is around 20 to 30 minutes. This is assuming one is using a fast enough quench to trap enough carbon for full hardness. Heating from a martensite structure can be good in some ways but for a forger without good temperature control, it is very easy to get too much carbon in solution which causes all kinds of problems. In my experience reheating from martensite (multiple cycles) doesn’t do much good unless you give the steel something to do. It’s easy and very effective to simply run a temper cycle anywhere from 350f to 500f before reheating. Those small transition carbides provide nucleation sites for new and smaller grains upon reheating and gives a much smaller grain size in the finished product. This also works very well on high alloy steels and you also have the option to use the higher tempering temps (secondary hardening) as well as the low tempering temps. Quite often I’ll pull the knife out before full austenite to hammer it straight but this doesn’t seem to have any negatives affects as then you are reheating from a very fine pearlite structure.
Great article, I’m surprised you haven’t got more comments.
could you point me to some sources substantiating that ac3 temperatures actually change? (that speed of transformation changes is clear.)
That is a good question and aside from my own experiences I can not ,point out any sources that substantiate that claim. When I harden from the annealed state at slightly over Ac3, I get full hardness using a fast quench. When I reharden from a martensite structure using the same hardening temp and quench rate, I can get a higher hardness. So I am assuming that the Ac3 temp has shifted lower to allow more carbon in solution and thereby getting a higher hardness.
…another possibility is that the Ac3 temp does not shift at all, and that the martensite structure with it’s faster transformation time is allowing more time at temperature which would put more carbon in solution for a higher hardness.
If you have methods that do something well for heat treating in a forge (I do for limited steels – anything with surplus chromium or more complicated than that, and I suspect they don’t do well, but with O1 and 26c3, I have test results that show results as good as a good furnace cycle) …at any rate, if you have something that actually works and proof of it, you should publish it on youtube in a video so that other people can try it and see if it works.
The uptake rate in comments, etc, will never get it any exposure. In my opinion, getting good results with simple steels isn’t difficult in a forge, but there’s so much bad information and oversimplification that if you have something, you need to put it somewhere to get past the “heat treating ____ the right way” videos where someone does nothing more than heat metal once and stuff it into vegetable oil.
Hello, what measures were taken to prevent decarburization and oxidation of coupons, especially during the 2100F/1h cycle? I presume you have used stainless steel foil, but it was not specified. I would also like to know what decarb/anti oxidation measures do you recommend for low hardenability steels, which wont harden when wrapped in ss foil(coatings/inert gas atmosphere in furnace)
hi
very interesting. i wonder how the 52100 managed to stay magnetic until 1445° when ferrite is supposed to turn non-magnetic at 1418°.
also in the first two tables did you mean hb hardness of 14.3 and 17 for spheroidized? did you det treat youself?
Hi David
the method I use for simple and low alloy steels is to hold slightly over ac3 for an hour and quench extremely fast. I’I’m not implying this can’t be done with a forge because I know there are some very good forgers out there. What would seem very hard for me might be fairly easy for an experienced forger. I personally can not do that on a consistent basis so I opt for a good furnace where I can get tight control on the temps. With that said I don’t want to take away from the art and instinct of forging because forging is an art, instinct, and science all rolled into one which I greatly admire. I simply do not have the ability to hold that long at temperature but if you can then do it. I would be interested to hear about your results
It’s just my opinion (thought I have some analysis for samples that started as good quality rolled O1 and 26c3 that suggests that I can hit targets) that the problem with most people heat treating in an open forge is that they try to imitate what they see in charts for furnaces. I can see color well by eye because I don’t have a furnace and trained myself to see it (the important part being seeing about what color steel will be in my forge when it transitions to nonmagnetic). Above and beyond that, I don’t know. For O1 and anything else simpler, I will shape bar stock (I don’t do “real forging” or reduction with three heats that go into nonmagnetic plus a color change). That’s followed by three heats allowed only to get close to nonmagnetic but never intentionally into it, and each partially quenched (to below black heat, but not to room cool) and then one quick heat well past nonmagnetic (but not held at temperature intentionally – bad things at high temperature combined with duration). the heat past nonmagnetic is done as quickly and evenly as possible and then a quench in parks 50, transfer to water once mostly cooled and tossed in the freezer.
A magnet is fine until the look of the color at the change to nonmagnetic is more memorable – it’s an easy process and it just makes things a little better than a quick high heat and quenching something like spheroidized O1 (in my experience testing wood chisels – not harder, but tougher and snapped samples have finer grain).
I don’t know what true blacksmiths do, and I don’t know what people with furnaces do, I’m sort of stuck in the middle depending stock that’s good to start or something to use like a very good quality older file (which have a feel an awful lot like 26c3)
Larrin easily has enough skill to do what I mentioned above even though he just got a forge, but I don’t know if it’s worth it for him to try and analyze the cycles. The payoff to be able to do only a small number of steels well in a forge and quickly is still limiting – it works great for 1084, 1095, O1, and 26c3 but it’s predictably unsatisfactory for 52100 (and anything like a stainless steel is out of the question)
Fascinating stuff! I got what i considered to be pretty good results with O1 and old Nicholson files by normalizing 3X for just above nonmagnetic and then quenching in light oil from just above nonmagnetic. But it sounds like you guys know way more than I do. Looks like I might have to buy or build a furnace, as holding steel at 1700 for an hour in a gas forge might be hard to do. Do you have to wrap the steel in stainless foil to prevent decarb, or does running the forge fuel rich solve that problem? Where i forge they have very light mineral oil intended for drenching horses, in the quench tank. Is that as good as expensive quench oil, or good enough? Transformer oil (light mineral oil) or transmission fluid seemed to work well, but you guys know more than me.
I don’t see in the article where I recommended 1700 degrees for an hour. Normalizing doesn’t typically take that long for the thin cross-sections used in knives.
I’m curious what your thoughts are with regard to the technique of looking for decalescence as a reliable method to know when the austenite transformation has been completed?
Much appreciated.
If you can reliably see it every time then it works. If not a magnet is cheap.
Curious as to why being close to this transformation is a good idea in the open atmosphere. No pro, but have had decent results with a narrow range of higher carbon steels by staying at before complete transformation with cycles, and then going well past by temp by eye but as quickly as possible and then quench on the quench.
No luck so far on very plain lower carbon steels, but the high heat seems to give better starting hardness and if it’s quick, no significant grain growth on 26c3 and O1, and subjectively, 1095, which came out a bit harder than expected if anything, but OK toughness given the hardness.
I have met a lot of people who are trying to hit a very low temp quench target in a forge only to end up with hardness below expected.
Judging by eye with color temp means same spot, same light level, etc, and for thermal cycles, training the eye with a magnet for a little while and checking in now and again.
Just supposing things based on experience, but I would expect someone in sheffield 180 years ago would be careful in the pre quench cycles, but heat quickly for quench. The virtue is three temp cycles and the quench can all be done in a matter of a couple of minutes.
He’s recommending it because he knows the metallurgy well. Too hot and you get mediocre toughness, for more than grain growth reasons. If you properly normalize the steel until it’s all pearlite, then quenching in a fast enough medium will fully harden it as soon as it’s nonmagnetic. Most people use oil that’s too slow like canola for a water quench steel like 1095, which per Larrin’s tests on quench didn’t even fully harden in parks 50 for ¼” stock, despite furnace stability. Water world perfectly for hardening it. Maybe try water for the low alloy steels. 5160 or 52100 is more tolerant to slightly less quench speed than pure carbon steels. Overheating the steel will make it harden in a suboptimal quench, with suboptimal toughness.
This is really awesome stuff for us beginners working off of a budget, thank you. I am wondering the best way to achieve a pearlitic structure prior to austenitizing using just a forge? Specifically for 1084. I’ve seen several varying methods and dont quite understand the best route for a good normalization cycle/grain refinement when dealing with the coarse spherodized steel from the manufacturer. Can I do several cycles just up to the normalization range instead of a soak at that temp? Or just go straight to auestenitize/quench, but going slightly past non-magnetic? Any help is greatly appreciated.
https://knifesteelnerds.com/2021/08/28/how-to-thermal-cycle-knife-steel/
I really want to get into 52100 but heard from an old timer that bar stock wants produced from the factory. They said it was only produced in round stock and ball bearings. Do you know if they started producing it or are they flattening round into flat stock? I’m not sure if the flat stock is an inferior product. Thank you for your knowledge and input.
Hi Doc,
My methods involve a forge, Tempilsticks, a magnet, and Parks 50 or AAA. I’ve studied your articles regarding forge heat treats carefully. Where I differ is that I austenetize after grinding in bevels. My edges can be as thin as 1/16″. Thus, the edges get to temperature far quicker. This has an effect of giving me differential heat treatment with or without Satanite packed onto the spine. I suspect that I am leaving some toughness on the table where the spine and ricasso are concerned, because they aren’t non-magnetic when the edge is and therefore, don’t harden. But I almost never get warping or twisting. Also, it gives me clearly visible ‘hamon’ effects even in steels like 80CRV2 due to my method of finishing (wet sanding w/ferric chloride). I like the look and the secondary grinding on hardened steel is reduced, but am I better served to heat treat before beveling?